How to Enable BitLocker on Windows 11 is a question many Windows users ask when they want to protect their files, personal data, and entire system from unauthorized access. With cyber threats increasing every year, securing your device is no longer optional — it’s essential. BitLocker, Microsoft’s built-in disk encryption tool, gives you a strong layer of security by encrypting your drive and keeping your information safe, even if your PC is lost or stolen.
Windows 11 continues Microsoft’s commitment to better security, and BitLocker has become easier, faster, and more powerful. This article explains every step in a clear and simple way so anyone can enable BitLocker confidently. Whether you use your PC for work, school, or personal use, learning how to enable BitLocker can dramatically improve your device’s security.
In this guide, you’ll discover what BitLocker is, why it matters, how it works, what you need before turning it on, and a full step-by-step tutorial for enabling it on Windows 11.
Let’s get started.
What Is BitLocker in Windows 11?
BitLocker is a full-disk encryption feature built into Windows 10 and Windows 11 Pro, Enterprise, and Education editions. Its purpose is simple:
Protect your data by encrypting your entire drive.
That means even if someone removes your hard drive and tries to read it on another device, your data stays protected. Without the encryption key, the drive becomes unreadable.
What BitLocker Protects You From:
- Theft of your laptop or PC
- Unauthorized people trying to access your files
- Hackers attempting offline attacks
- Sensitive personal or business data leaks
- Hard drive removal or cloning attempts
BitLocker does NOT slow down your system. Modern devices with TPM 2.0 handle the encryption in hardware, so performance impact is minimal.
Why You Should Enable BitLocker on Windows 11
Here are strong reasons why everyone should enable BitLocker:
✔ 1. Protects Your Personal Data
Your photos, documents, passwords, and emails stay encrypted and locked behind BitLocker.
✔ 2. Provides Enterprise-Level Security
BitLocker uses AES encryption, the same standard used by governments and companies worldwide.
✔ 3. Works Automatically With TPM 2.0
Windows 11 requires TPM 2.0, which makes BitLocker even more secure and seamless.
✔ 4. Protects Your Device Even When It’s Off
Unlike login passwords, encryption protects your data even if the PC never boots.
✔ 5. Essential for Work or School Devices
Many companies and universities require BitLocker for compliance and data protection policies.
Requirements to Enable BitLocker on Windows 11
Before enabling BitLocker, make sure your PC meets the requirements:
Mandatory Requirements
- Windows 11 Pro, Education, or Enterprise
- TPM 1.2 or TPM 2.0 (most Windows 11 PCs already have 2.0)
- Administrator permissions
Optional but Recommended
- Microsoft account to store your recovery key
- A stable laptop battery or AC power
Step-by-Step: How to Enable BitLocker on Windows 11
Now let’s walk through the process in the simplest and clearest form possible.
Step 1: Open the Settings Menu
- Click the Start Menu
- Select Settings
- Go to Privacy & Security
- Select Device Encryption or BitLocker Drive Encryption
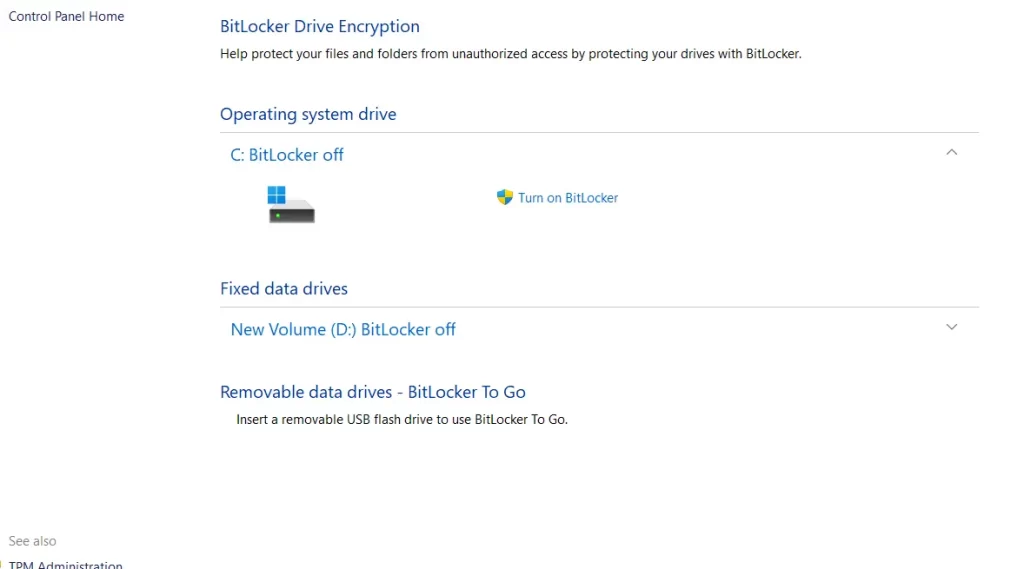
If you don’t see Device Encryption, look for BitLocker under Control Panel → System and Security → BitLocker Drive Encryption.

Step 2: Choose the Drive You Want to Encrypt
Most users start with the C: system drive, but you can encrypt any drive.
Click Turn on BitLocker next to the drive.

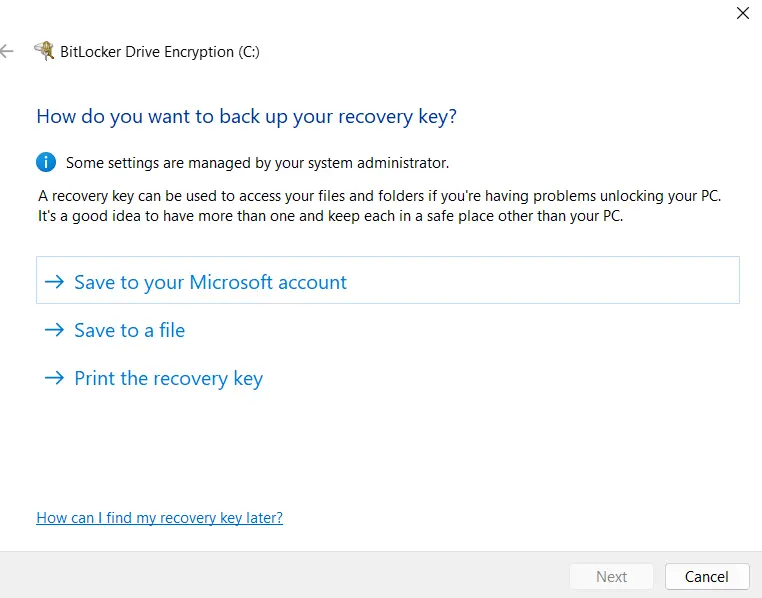
Step 3: Choose How to Back Up the Recovery Key
This step is extremely important. If you lose your password and recovery key, you will lose access to your files permanently.
You can save the recovery key by:
- Saving to your Microsoft account
- Saving to a USB flash drive
- Saving to a file on your computer (not recommended)
- Printing the key on paper
The safest option is saving it to your Microsoft account because you can always retrieve it online.

Step 4: Choose How Much of the Drive to Encrypt
Windows offers two options:
✔ Encrypt used disk space only
- Faster
- Good for new PCs or recently installed Windows
✔ Encrypt entire drive
- More secure
- Recommended for laptops and older devices
Choose based on your preference.
Step 5: Choose Encryption Mode
Windows will ask you to choose between:
- New encryption mode (XTS-AES) — better for internal drives
- Compatible mode — for drives that might be moved to older Windows versions
Select New encryption mode unless you plan to use the drive on another computer.
Step 6: Start the Encryption Process
Click Start Encrypting.
The process may take several minutes to several hours depending on:
- Drive size
- Amount of data
- Drive speed (SSD is faster than HDD)
You can continue using your computer during encryption.
How to Check If BitLocker Is Enabled
You can verify BitLocker using three methods:
✔ 1. Settings
Go to Privacy & Security → Device Encryption
If it says “On,” BitLocker is active.
✔ 2. Control Panel
Control Panel → System and Security → BitLocker Drive Encryption
Drive should show “BitLocker On.”
✔ 3. Command Prompt
Type:
manage-bde -status
This displays all encryption details.
How to Turn Off BitLocker in Windows 11
If you ever want to turn it off:
- Open Control Panel
- Go to BitLocker Drive Encryption
- Select the drive
- Click Turn Off BitLocker
- Confirm to decrypt the drive
Decryption may take time but will not delete your files.
Common Problems When Enabling BitLocker
❗ TPM Not Detected
Enable TPM in BIOS:
Security → TPM → Enable
❗ BitLocker not available on Windows 11 Home
This edition does NOT support BitLocker. You must upgrade to Windows 11 Pro.
❗ Cannot save recovery key
Try signing into a Microsoft account.
Final Thoughts
Learning How to Enable BitLocker on Windows 11 is one of the best ways to protect your personal files and secure your computer. Whether you store work documents, family photos, financial files, or sensitive data, BitLocker ensures that no one can access them without your permission.
Windows 11 makes encryption easier than ever. With TPM 2.0, a clean interface, and improved performance, enabling BitLocker is now a simple and powerful step toward digital security.
If you value your privacy and want strong protection with minimal effort, BitLocker is the perfect tool.

