The moment you fire up a brand new PC or install Windows 11 from scratch, you eventually hit a wall. A screen that seems to demand one thing above all else: signing in with a Microsoft account Windows 11.
It’s an aggressive push from Microsoft. They really want you tethered to their ecosystem, and the installation process is designed to make you feel like you have no choice. But is that truly the case? Is a Microsoft account Windows 11 a non-negotiable part of setting up your computer?
The short, simple answer is: No. It is not.
While Microsoft has made it incredibly tricky to bypass, especially on the Home edition, there are still ways to reclaim control of your PC and set it up the old-fashioned way—with a local account. This article will dive into why Microsoft is so insistent, the pros and cons of using a Microsoft account versus a local account, and the simple, effective methods you can use to skip the sign-in and keep your data private.
The Big Why: Why Microsoft Pushes the Microsoft Account
Before we talk about how to skip it, let’s talk about why it’s there in the first place. Microsoft isn’t just doing this to annoy you; it’s a strategic business move that benefits the company immensely.
1. Cloud Integration and Synchronization
A Microsoft account is your key to the cloud. It automatically links your PC to OneDrive (cloud storage), allowing for easy file backup and synchronization across multiple devices. It also syncs your settings, wallpaper, and browser favorites (if you use Edge) across your machines. This is, admittedly, very convenient for people who use multiple Windows devices.
2. Ecosystem Lock-In
The account is mandatory for accessing the Microsoft Store, downloading apps, and using services like Xbox Live, Teams, and Microsoft 365. By making a Microsoft account mandatory, they are ensuring you are locked into their platform for everything, increasing the likelihood you’ll purchase their products and subscriptions.
3. Data Collection and Personalization
Like all major tech companies, Microsoft collects data to “personalize” your experience and, crucially, to improve their targeted advertising. A Microsoft account is a rich source of data: your purchase history, your location, your synced files, and your app usage. This is the biggest reason privacy-conscious users prefer to avoid a compulsory Microsoft account Windows 11 setup.
Local Account vs. Microsoft Account: A Simple Comparison
You might be wondering what the actual difference is on a day-to-day basis. Here is a simple breakdown of the main pros and cons.
| Feature | Microsoft Account (MSA) | Local Account |
| Account Type | Tied to an email address; requires a connection to Microsoft servers. | Stored locally on the PC; only accessible on that specific machine. |
| Setup Requirement | Mandatory during the initial setup of Windows 11 Home (with an internet connection). | Requires specific steps to bypass the MSA prompt. |
| Syncing | Syncs settings, files (via OneDrive), passwords, and more across all linked devices. | No syncing. Settings and data are unique to the PC. |
| App Store Access | Required to download apps from the Microsoft Store. | Cannot access the Microsoft Store. |
| Password Recovery | Easy, via email or phone number through Microsoft’s online portal. | Difficult. If you forget it, you may lose access to your PC unless you have a recovery disk. |
| Privacy | Lower, as data and activity are linked to your online profile. | Higher, as data is kept on the device and not directly linked to an online identity. |
Ultimately, a Microsoft account Windows 11 setup provides convenience at the cost of control and privacy. A local account offers more privacy and independence but sacrifices syncing and store access. For power users, students, or business professionals who live on the cloud, the MSA is often preferred. But for basic users, public computers, or those prioritizing data sovereignty, the local account is the only way to go.
The Escape Plan: How to Bypass the Microsoft Account Prompt
The methods to skip the sign-in screen have changed over time, as Microsoft keeps trying to plug the holes. As of the time of writing, these are the most reliable ways to avoid creating a Microsoft account Windows 11 during setup.
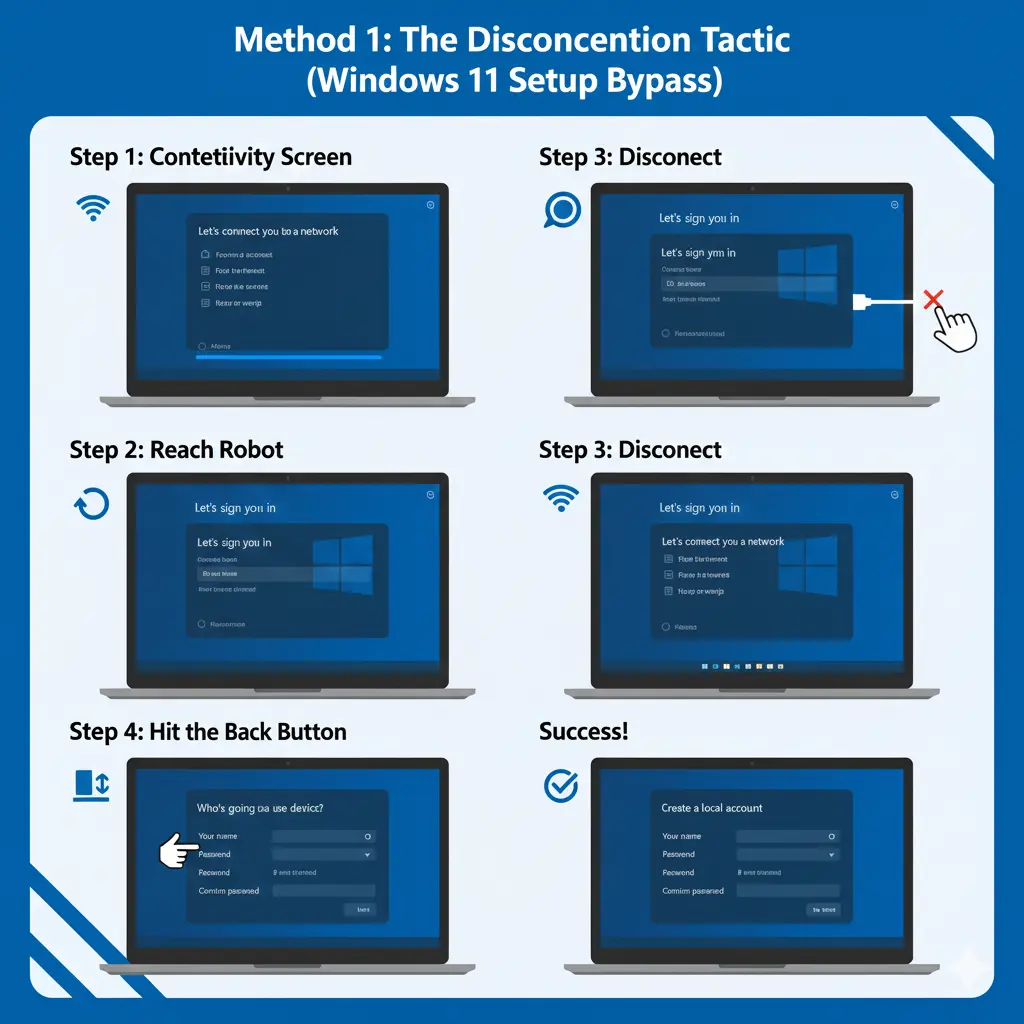
Method 1: The Disconnection Tactic (Windows 11 Home & Pro)
This is the simplest method, but it may not work if Microsoft has patched it on your specific build.
- Start the Setup: Proceed through the initial setup screens (Language, Keyboard, etc.).
- The Connectivity Screen: When you get to the “Let’s connect you to a network” screen, connect to your Wi-Fi or plug in an Ethernet cable.
- The Critical Moment: Once connected, the setup will push you to the “Let’s sign you in” screen. Wait for this screen to appear.
- Disconnect: Once you see the sign-in prompt, immediately unplug your Ethernet cable or disconnect from your Wi-Fi.
- Hit the Back Button: Click the back arrow in the top left corner of the screen.
- Local Account Creation: Windows will realize it can’t verify your account and should revert to the old “Who’s going to use this device?” screen, allowing you to create a local user name and password.

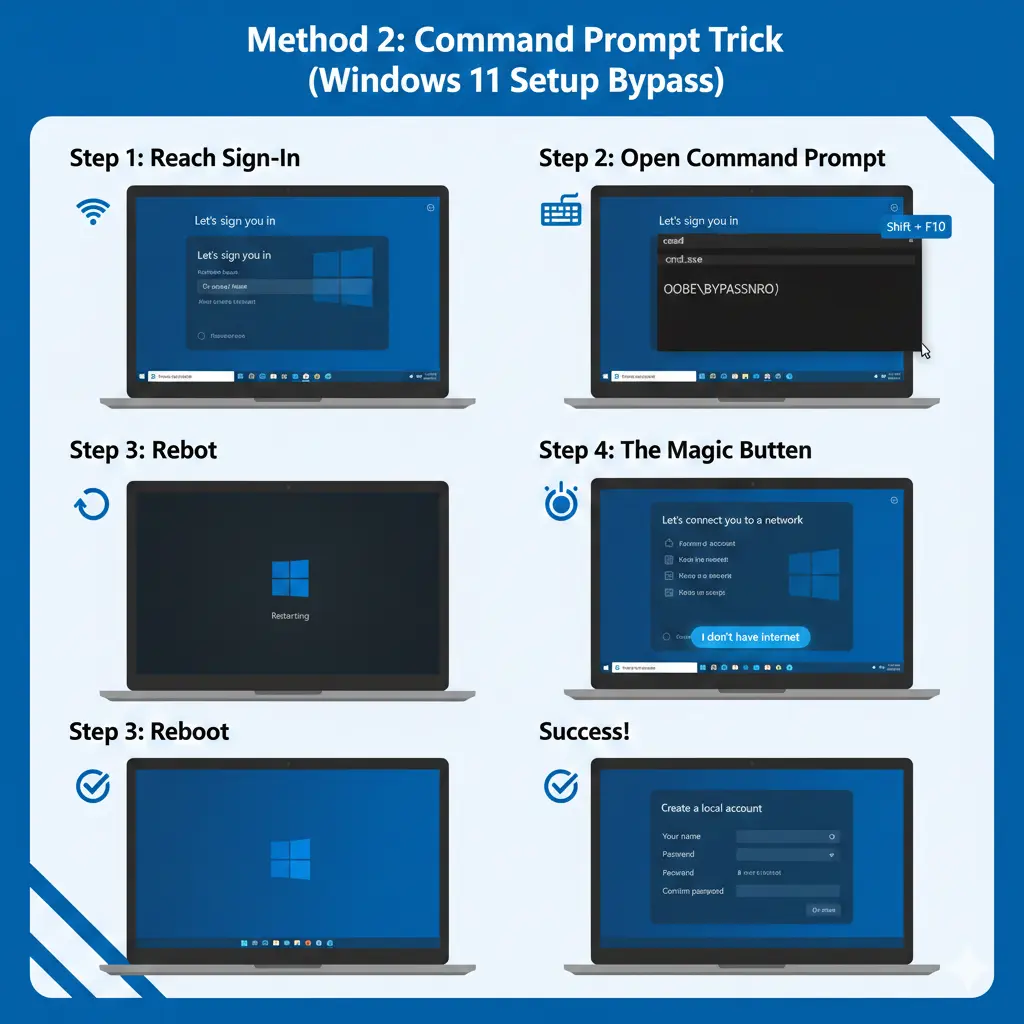
Method 2: The Command Prompt Trick (The Fail-Safe)
If the disconnection method fails, or if you simply want a guaranteed way, this trick works on almost every modern Windows 11 build.
- Connect to the Internet: Proceed through the setup and connect to your Wi-Fi or Ethernet.
- Reach the Sign-In: Let the setup proceed to the “Let’s sign you in” screen.
- Open Command Prompt: Press Shift + F10 (sometimes Shift + Fn + F10 on laptops) to open the Command Prompt.
- The Key Command: In the Command Prompt window, type the following command exactly as it appears and press Enter:OOBE\BYPASSNRO
- Reboot and Repeat: Your PC will immediately reboot. The setup process will start over.
- The Magic Button: When you return to the “Let’s connect you to a network” screen, you will now see a new option that was not there before: “I don’t have internet.” Click it.
- Finalize: Windows will then allow you to proceed with a local account setup.
This command forces the Windows Out-of-Box Experience (OOBE) to skip the Network Requirements step (NRO), effectively telling Windows that it’s okay to proceed without an internet connection and, therefore, without a mandatory sign-in. This is the essential trick for those who must avoid the Microsoft account Windows 11 integration.

Method 3: The Fake Email Tactic (The Hilarious Bypass)
This one is less about the command line and more about a loophole that Microsoft left open for testing purposes.
- Enter a “Dummy” Email: On the “Let’s sign you in” screen, enter the following email address:[email protected]
- Enter Any Password: When prompted for the password, type in literally anything.
- The Error Message: Windows will attempt to sign in, fail, and show an error message.
- Local Account Prompt: After the error, instead of forcing you to retry, the setup will often offer to create a local account for you instead. This works because Microsoft uses this email address internally to test failure states in the setup process.
The Last Word on Windows 11 and Your Control
The continuous effort by Microsoft to make the Microsoft account Windows 11 a required step is an industry trend. Tech companies want to turn their software into a service, where you are constantly connected and providing data.
However, remember this: It is your PC. You own the hardware, and you have the right to decide how to use the operating system installed on it. Knowing these simple tricks—especially the OOBE\BYPASSNRO command—gives you back that control.
Whether you choose a Microsoft account for its convenience or a local account for its privacy, the key is making an informed decision, not a forced one. Don’t let the setup screen dictate your experience. Take the time to implement one of the bypass methods, and you will have a clean, private, and fully functional Windows 11 installation that operates exactly how you want it to.

