Windows 11 Storage Cleanup is something every user eventually needs. Whether your computer is slowing down, throwing low-disk warnings, or your SSD is nearly full, knowing how to clean up storage properly can dramatically improve your system’s performance. The good news is that Windows 11 offers several built-in tools that make decluttering your device easier than ever.
In this comprehensive guide, you’ll learn step-by-step methods to clean your storage, remove junk files, manage applications, clear temporary data, and optimize your system without installing any third-party software. Everything is written clearly and simply, just as a human tech writer would explain it—no overly complicated language, no robotic tone.
⭐ Why Storage Cleanup Matters in Windows 11
Windows 11 is designed to run smoothly, but like any operating system, it gradually collects unnecessary files: temporary files, old updates, cache data, unused apps, log files, thumbnail files, etc. Over time, these accumulate and take up valuable disk space.
By performing regular Windows 11 Storage Cleanup, you can:
- Improve system performance
- Increase available disk space
- Reduce startup times
- Keep your file system organized
- Prevent slowdowns caused by background clutter
A clean system simply works better, and Windows 11 gives you all the tools you need.
🔧 1. Use Windows 11’s Built-In Storage Sense
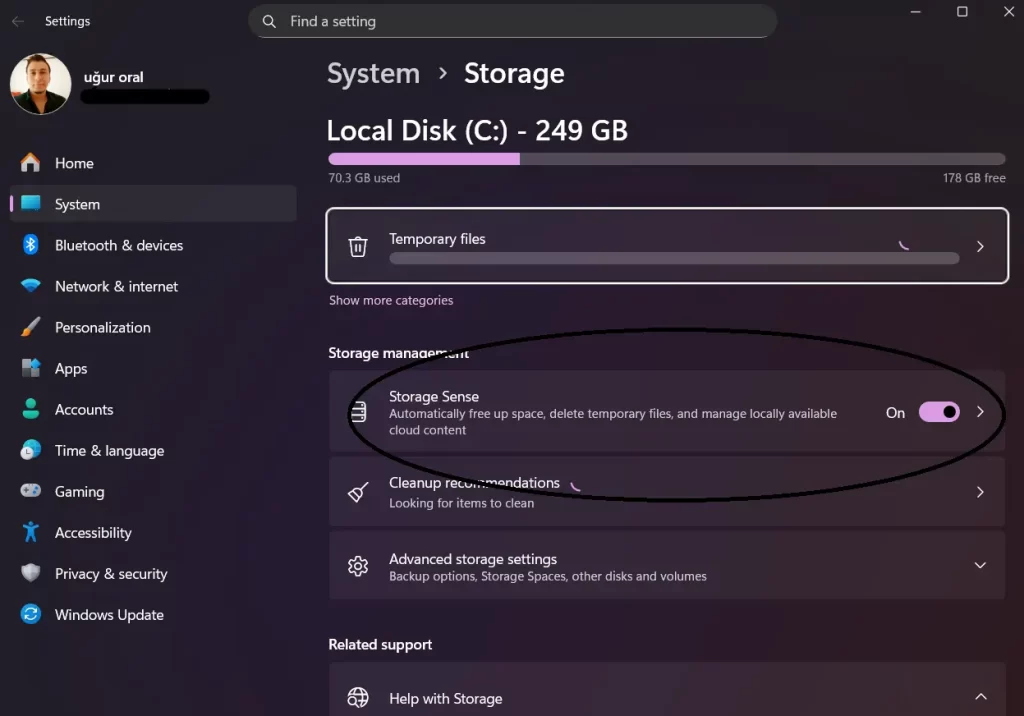
Windows 11 includes an automated cleanup tool called Storage Sense, which can automatically remove temporary files and old system junk.
✔ How to turn on Storage Sense:
- Open Settings
- Go to System
- Click Storage
- Toggle Storage Sense to On
- Click Storage Sense settings to customize it
You can set it to:
- Automatically delete temporary files
- Clean recycle bin items after a set number of days
- Remove unused cloud-backed content
- Run cleanups on a schedule
This is the easiest way to keep your system healthy without lifting a finger.

🧹 2. Manually Run the Storage Cleanup Tool
If you prefer doing things manually, Windows 11 allows you to run cleanup operations anytime.
Steps:
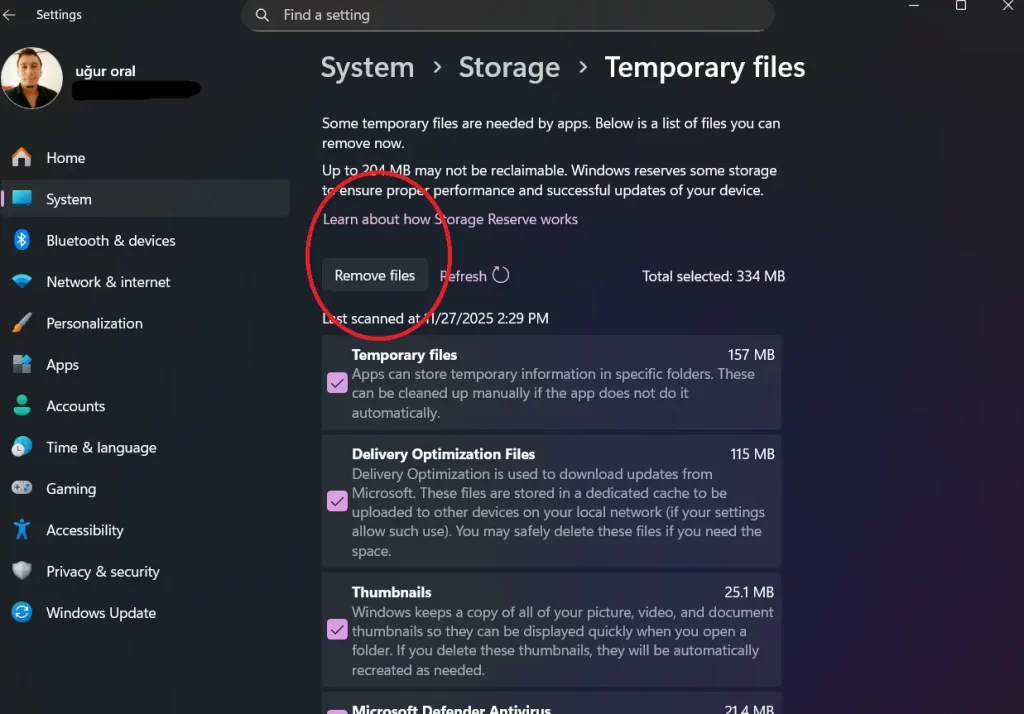
- Open Settings
- Select System > Storage
- Click Temporary files
- Choose what you want to remove
- Click Remove files
You can delete:
- Temporary Windows installation files
- Delivery Optimization files
- Error reports
- Thumbnail cache
- Recycle Bin contents
- Windows Update cleanup files
Be careful not to delete files you may still need, especially under “Downloads.”

🗂️ 3. Clean Up Large and Unnecessary Files
Windows 11 can show you exactly which folders take the most space.
How to view large files:
- Open Settings
- Go to Storage
- Click Show more categories
- Choose:
- Documents
- Videos
- Pictures
- Other files
From here, you can open folders to delete or move files to external or cloud storage.
📦 4. Uninstall Apps You Don’t Use
Unused apps take up space and often run background services that slow your system.
Remove them by:
- Opening Settings
- Going to Apps
- Clicking Installed apps
- Sorting by size
- Uninstalling anything you don’t use
This method alone often frees several gigabytes.
☁️ 5. Use OneDrive’s “Free Up Space” Feature
If you use OneDrive, it can store files in the cloud while removing local copies from your disk.
To free local space:
- Right-click any file or folder in OneDrive
- Choose Free up space
Your files remain accessible online but no longer consume space on your SSD.
🧰 6. Clean Up System Restore Points
Windows creates restore points for safety, but these can become very large.
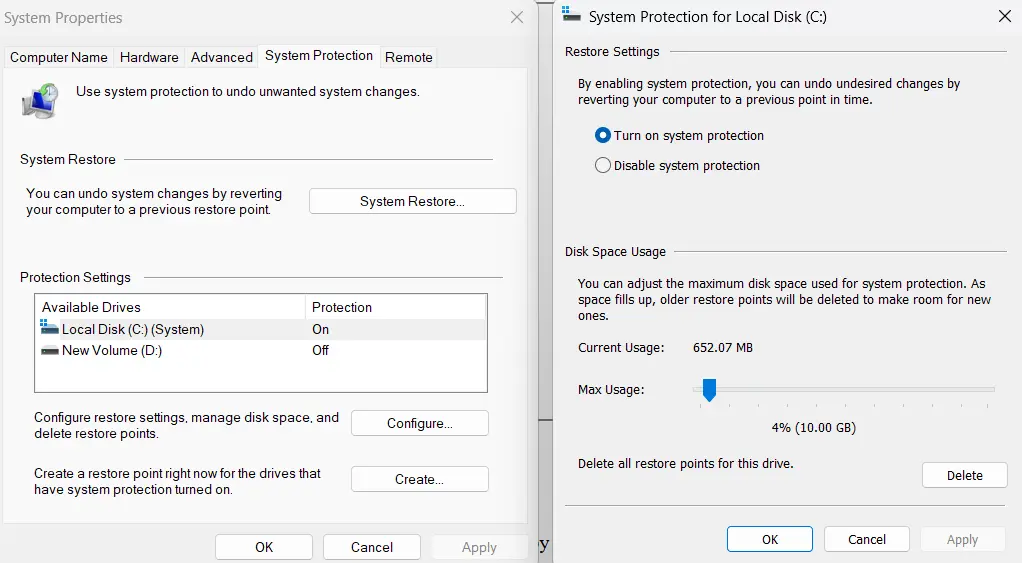
Steps:
- Search for Create a restore point
- Open System Protection
- Click Configure
- Delete older restore points or reduce space usage
Keep at least one restore point available for safety.

♻️ 7. Empty Your Recycle Bin Regularly
It sounds simple, but many users forget. Files in the Recycle Bin still occupy your SSD until you empty it.
You can empty it manually or let Storage Sense handle it automatically.
🖼️ 8. Delete Duplicate Photos and Files Manually
Windows 11 doesn’t auto-remove duplicates, but manually reviewing your Pictures, Downloads, and Documents folders can reclaim a surprising amount of storage.
If you prefer an easier method, you can use safe duplicate-finding tools—but this guide focuses on built-in functionality.
🧪 9. Clean Windows Update Files
Windows Update files can become quite large over time.
To clear them:
- Open Settings
- Go to System > Storage
- Click Temporary files
- Select Windows Update Cleanup
This alone can free several gigabytes.
🚀 Final Tips for Keeping Windows 11 Storage Clean
To maintain a healthy system long-term, follow these tips:
- Enable Storage Sense
- Manually review your Downloads folder weekly
- Uninstall apps you no longer need
- Move large videos/photos to external storage or cloud
- Use OneDrive’s “free up space” feature
- Empty your Recycle Bin regularly
A clean drive means a smoother, faster PC — and you’ll prevent many performance problems before they start.
🎉 Final Thoughts
Windows 11 Storage Cleanup doesn’t require advanced knowledge or extra tools. Everything you need is built directly into your system. With just a few minutes of maintenance each week, you can keep your computer running at peak performance.
Whether you’re freeing up a few gigabytes or managing a nearly full SSD, these methods will help you take control of your storage quickly and easily.

