If your Xiaomi robot vacuum won’t start a clean and just repeats “LDS laser sensor blocked” or flashes Error 1, the actual cause is usually a lot dumber than it sounds — and I mean that in the best way, because dumb causes are easy to fix. The LDS laser sensor blocked error almost always comes down to something physically obstructing the spinning lidar turret on top of the vacuum, not a real hardware failure. Mine threw this error out of the box once, and the cause was embarrassingly simple.
So let’s go through the actual causes before you assume you got a defective unit.
Quick Answer
- Most common cause: the plastic protective film or tape from packaging still covering the LDS turret after unboxing.
- Second most common: dust, hair, or debris physically obstructing the spinning laser sensor housing.
- Third: direct sunlight or very bright light hitting the sensor during startup, which can trigger a false block reading.
- Fastest fix that works most often: manually spin the LDS turret by hand and check for resistance or obstruction.
- If it’s mechanically stuck or spins with a grinding noise, that’s a motor issue and needs service, not cleaning.
Why It Fails
LDS stands for Laser Distance Sensor — it’s the spinning turret on top of the vacuum that shoots a laser around 360 degrees to map your home in real time. That constant spin is mechanically simple but also exposed, sitting right at the top of the unit where dust, hair, and packaging debris all tend to accumulate. When the turret can’t spin freely, or the laser itself gets physically blocked, the vacuum can’t build or trust its map, and it throws Error 1 rather than trying to clean blind.
From what I’ve seen, there are three causes that account for almost every report, plus one that’s specific to first-time setups:
Leftover packaging film or tape. This is the one that gets people the most, especially on a brand new unit. Xiaomi ships these with a thin plastic protective film over various sensors, and the LDS turret sometimes has a small piece of tape or film that’s genuinely easy to miss — it’s clear, low-profile, and doesn’t look like “packaging” in the way a big plastic wrap does. If this is your first clean ever and you’re getting Error 1 immediately, check here first before anything else.
Physical debris buildup over time. Hair, dust, and pet fur work their way into the gap around the turret base after months of use, especially in homes with pets or long hair. It doesn’t take much — even a small amount wedged at the base can add enough resistance to stop the turret from completing a full rotation, which the vacuum interprets as a blocked sensor rather than a spin issue specifically.
Bright direct light interference during startup. The LDS sensor’s laser can get confused by very strong ambient light, particularly direct sunlight hitting the unit at the exact moment it’s trying to calibrate on startup. This is more of a timing quirk than a hardware fault — moving the vacuum out of direct light, or just waiting for a different time of day, resolves it without touching anything.
An overlooked cause worth checking: a stuck turret from being knocked or dropped, even a minor bump like the vacuum getting bumped by a chair leg while docked. It doesn’t always show visible damage, but a slight physical misalignment inside the housing can cause enough drag to trigger the same error as a debris blockage, and cleaning alone won’t fix that — it needs a firmer manual check for resistance.
Common Scenarios
- Fresh out of the box, first setup attempt, almost always the packaging film.
- Homes with pets or long hair, buildup accumulating gradually over weeks or months of normal use.
- Sunrooms or rooms with large windows, direct sunlight during specific times of day.
- After the vacuum’s been bumped or knocked, even without an obvious drop, like getting nudged while docked near foot traffic.
Step-by-Step Fixes
Step 1: Check for packaging film first, especially if this is a new unit
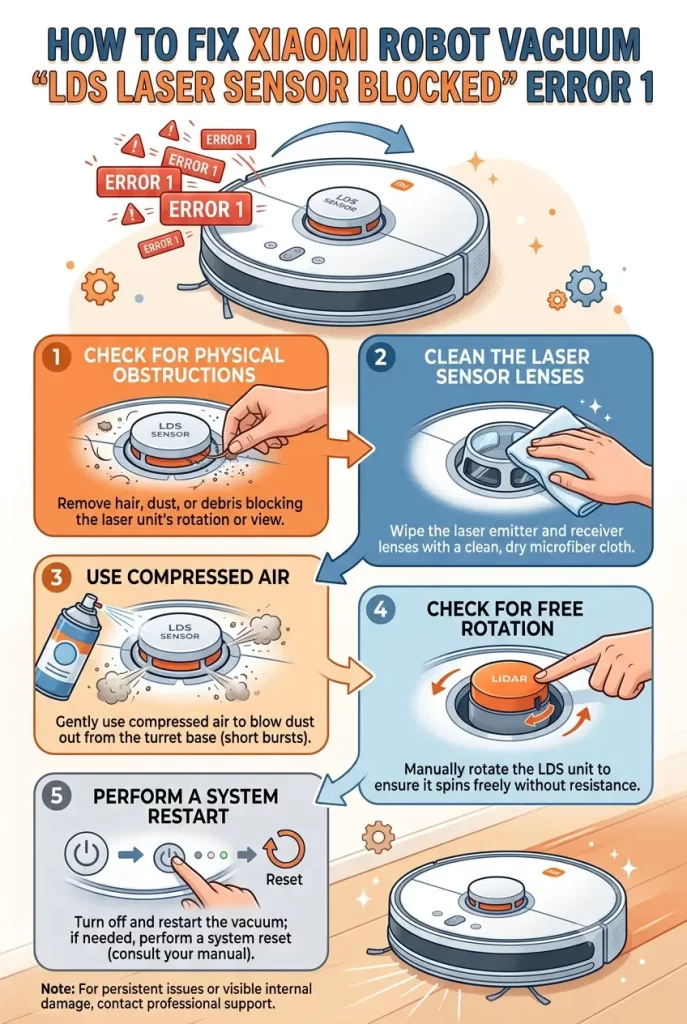
Look closely at the LDS turret — the round bump on top of the vacuum. Run a fingernail gently around its edge and base, checking for a thin, clear film or a small strip of tape that’s easy to overlook against the plastic housing. Peel it off fully if found. This alone resolves the error on a meaningful chunk of “brand new unit won’t work” reports.
Step 2: Manually spin the turret by hand
With the vacuum powered off, gently rotate the LDS turret with your fingers. It should spin freely with minimal resistance, roughly a full rotation without catching. If you feel grinding, catching, or real resistance at a specific point, that tells you there’s a physical obstruction or misalignment rather than just a software false-positive — move to Step 3 rather than skipping to a restart.
Step 3: Clean around the turret base with a dry brush and compressed air
Use a small dry brush (an old toothbrush works fine) to clear visible hair and dust from the gap around the base of the turret where it meets the vacuum’s top housing. Follow with a few short bursts of compressed air aimed into that gap. Don’t use liquid cleaners here — moisture near the sensor and its spinning mechanism isn’t worth the risk.
Step 4: Wipe the sensor’s clear cover/lens gently
If your model has a small clear lens window as part of the turret assembly, wipe it gently with a dry microfiber cloth. Smudges, dust film, or fingerprints on this lens can interfere with the laser even when the turret itself spins freely — a genuinely separate cause from mechanical obstruction, and one that’s easy to miss if you only check for spinning resistance.
Step 5: Move the vacuum out of direct sunlight and retry
If none of the physical checks show an obvious problem, and the error tends to happen at a specific time of day, try running the vacuum in a shaded room or at a different time. If it starts fine away from direct light, that confirms a light-interference cause rather than anything mechanical, and you can plan cleaning schedules around it going forward rather than troubleshooting further.
Step 6: Restart the vacuum fully
Power off completely (most models have a physical power switch on the side or bottom, not just the dock), wait about 30 seconds, then power back on. This clears any temporary sensor calibration state and is worth doing after any of the physical fixes above, not usually as a fix on its own.
Technical Comparison Table
| Symptom | Likely cause | Fix reliability |
|---|---|---|
| Error on very first setup attempt | Leftover packaging film | High |
| Turret spins with visible resistance/grinding | Debris or mechanical misalignment | Medium — cleaning helps, may need service |
| Error only in bright rooms or specific times | Direct sunlight interference | High, resolves by relocating |
| Turret spins freely but error persists | Lens smudge or internal sensor fault | Medium — clean lens first, service if unresolved |
What Actually Worked For Me
Mine happened literally on the first setup — unboxed it, set it on the dock, tried to start a mapping run, and got the LDS blocked error immediately. First thing I did, embarrassingly, was assume it was defective and start looking up return policies.
Then I actually looked closely at the turret instead of just glancing at it, and there it was — a thin strip of clear film wrapped partway around the base, thin enough that it hadn’t registered as “packaging” the first two times I’d looked at the unit. Peeled it off, ran the vacuum again, worked immediately.
So — genuinely a five-second fix once I actually saw what I was looking at, but I’d spent a solid ten minutes assuming hardware failure before that. Worth saying because I don’t think I’m the only one who’s done this; the film really is that easy to miss on a glossy black turret under normal room lighting.
The second time I ran into a version of this error was months later, after getting a new rug that sheds more than expected — that time it really was hair buildup at the turret base, confirmed by feeling resistance when I spun it by hand. Brush and compressed air cleared it in a couple minutes, no film or packaging involved that time.
Advanced Fixes and Edge Cases
Check the app’s error log for a pattern rather than a one-off. Most Xiaomi vacuum apps (Mi Home or the Xiaomi Home app depending on region and model) keep an error history. If Error 1 is recurring rather than a single incident, check whether it’s happening at consistent times of day (pointing toward light interference) or randomly (pointing more toward debris buildup that’s gradually worsening).
Test the turret motor listening for consistent RPM sound. With the vacuum powered on and attempting to start a clean, listen closely to the turret — a healthy LDS motor has a consistent, quiet hum. Grinding, clicking, or an audibly uneven spin rate suggests a motor or bearing issue rather than a simple obstruction, and that’s a stronger case for contacting support or service rather than continued at-home cleaning.
Check for firmware updates specifically addressing LDS sensor false positives. A few Xiaomi vacuum models have had firmware updates that adjusted sensor sensitivity thresholds after reports of false “blocked” errors in bright rooms. Checking the app for a pending update before assuming a hardware cause is worth the two minutes it takes.
If under warranty and the turret shows physical damage (cracked housing, visibly bent turret), stop troubleshooting and contact support directly. Continuing to run the vacuum with visible physical damage to the turret risks worsening the issue and complicating a warranty claim if you’ve clearly been operating it in a damaged state.
Prevention Tips
- Double-check for leftover packaging film specifically around the turret base during initial unboxing, not just the obvious plastic wrap around the whole unit.
- Clean around the LDS turret base every few weeks in pet-heavy or long-hair households, more often than you’d think to check it.
- Avoid placing the dock in direct sunlight paths if you’ve had light-interference errors before — even an hour of strong afternoon sun through a window can be enough.
- Keep the vacuum’s app updated, since sensor sensitivity firmware fixes do get pushed out periodically.
- When manually moving or repositioning the vacuum, lift and set it down gently rather than sliding or bumping it against furniture, to avoid jostling the turret’s internal alignment over time.
FAQ
Is Error 1 always a hardware problem? No, most of the time it isn’t — packaging film and debris account for the large majority of reports, not a defective sensor.
Will restarting the vacuum alone fix a physically blocked sensor? No, a restart only clears temporary state — if there’s an actual physical obstruction, you need to clear it first before a restart does anything useful.
How do I know if it’s the motor rather than debris? Grinding or clicking sounds during turret spin, combined with visible resistance when turning it by hand even after cleaning, point toward a motor issue rather than debris.
Does this error mean my map data got corrupted? Not necessarily — clearing the physical cause and restarting usually lets it remap normally without needing to reset saved maps.
Should I try opening the turret housing myself? Not recommended unless you’re comfortable with it and don’t mind risking the warranty — most fixes don’t require opening anything, and the turret assembly is more delicate than it looks.
Editor’s Opinion
Check for leftover packaging film before anything else, especially on a brand new unit — it’s an easy thing to miss and accounts for a lot of these reports. If it’s an older unit, hair and dust buildup around the turret base is the next most likely thing, and a dry brush handles it fine. Grinding noise or real resistance when you spin it by hand is the one sign that means “stop cleaning, contact support” instead of continuing to troubleshoot at home.
