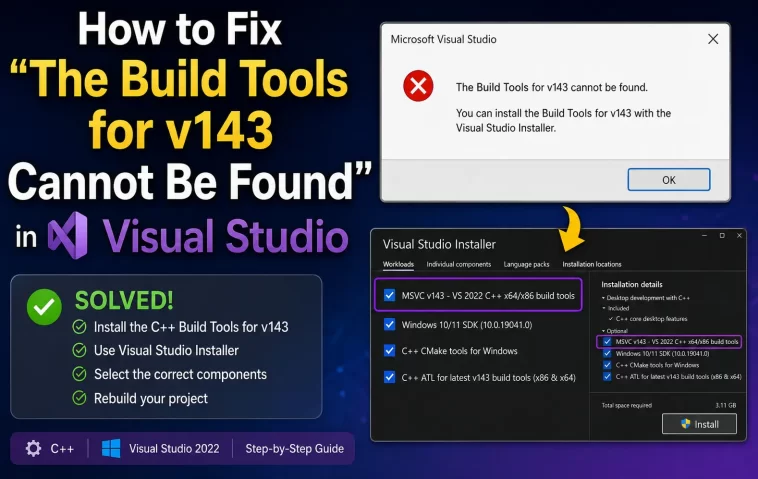
If you’ve just tried to build a C++ project and got slapped with “The build tools for v143 (Platform Toolset = ‘v143’) cannot be found,” you’re not alone — this is one of the most common toolset errors in Visual Studio 2022. I ran into it after a fresh Windows reinstall last month, and it took me longer than I’d like to admit to figure out what was actually missing. The short version: it’s almost always a missing or mismatched component, not a broken project file.
Quick Answer
- Open Visual Studio Installer and check that the “Desktop development with C++” workload is installed
- Confirm the MSVC v143 build tools component is checked, not just an older version
- Right-click your project → Retarget Solution if you’re opening someone else’s project
- Repair your Visual Studio installation if components look installed but still aren’t detected
- Check your
.vcxprojfile for a hardcodedPlatformToolsetvalue that doesn’t match what’s on disk
Why This Error Actually Happens
So here’s the thing — “v143” isn’t some random label. It’s the internal version tag for the MSVC toolset that ships with Visual Studio 2022. v142 was 2019, v141 was 2017, and so on. When your project file references v143 but Visual Studio can’t find a matching compiler toolchain on your machine, it throws this exact error.
There are a handful of real causes, and they’re not all the same fix:
The C++ workload was never installed. This is the big one. A lot of people install Visual Studio for something like Python or web dev, then later open a C++ project and assume the compiler is just… there. It isn’t, by default.
You installed an older Visual Studio version alongside 2022. If you’ve got 2019 and 2022 side by side, Windows sometimes gets confused about which install owns which toolset registration. I’ve seen this cause phantom “cannot be found” errors even when the tools are technically present.
A project file was created on a different machine with a newer toolset. If a coworker or a GitHub repo has <PlatformToolset>v143</PlatformToolset> hardcoded and your install only has v142, you’ll get this error immediately on open.
A partial or interrupted Visual Studio Installer update. This one’s annoying because everything looks installed in the installer UI, but the actual compiler binaries under VC\Tools\MSVC are missing or incomplete. Not 100% sure why this happens, but from what I’ve seen it’s usually tied to an update that got interrupted by a reboot or a flaky connection.
Corrupted or missing registry entries for the toolset. Rare, but it happens — usually after a botched uninstall of an older VS version.
Common Scenarios Where This Pops Up
You’ll usually hit this in one of these situations:
- Opening an older
.slnfile that was last touched in Visual Studio 2019 or earlier - Cloning a GitHub project and building it for the first time
- Setting up a new dev machine and jumping straight into an existing codebase
- Switching between an ARM64 and x64 build configuration on the same project
- CI/CD build agents where the wrong VS version got installed by a provisioning script
That last one caught me off guard the first time. A build pipeline that worked fine on one runner suddenly failed on a fresh one, and it turned out the base image just didn’t have the C++ workload baked in.
Step-by-Step Fixes
Step 1: Check What’s Actually Installed
Open Visual Studio Installer (search for it in the Start menu — it’s a separate app from Visual Studio itself). Click Modify on your VS 2022 install.
Go to the Workloads tab and confirm “Desktop development with C++” has a checkmark. If it doesn’t, check it and let it install. This alone fixes the error for a big chunk of people.
Step 2: Verify the Individual MSVC Component
Even with the workload checked, click over to the Individual components tab and search for “MSVC.” You want to see something like “MSVC v143 – VS 2022 C++ x64/x86 build tools.” If it’s unchecked, check it.
And yes, this is genuinely different from the workload checkbox — the workload can be “installed” while still missing the specific version component your project needs.
Step 3: Retarget the Solution
If the project was built for a different toolset and you don’t need it locked to v143 specifically:
- Right-click the project in Solution Explorer
- Select Retarget Projects
- Choose your installed Platform Toolset version from the dropdown
- Click OK
This is the fastest fix if you don’t care about matching the exact original toolset — but it does mean your project file changes, which matters if you’re sharing the repo with others still on an older setup.
Step 4: Edit the .vcxproj Directly
Sometimes the GUI retarget doesn’t stick, or you want more control. Open the .vcxproj file in a text editor and look for:
xml
<PlatformToolset>v143</PlatformToolset>Change it to whatever version you actually have installed (v142, v141, etc.), save, and reopen the solution.
Step 5: Repair the Visual Studio Installation
If steps 1–4 didn’t do anything, the installer itself might be lying to you about what’s present. In Visual Studio Installer, click the dropdown next to your VS 2022 entry and choose Repair. Let it run fully — this can take a while, so don’t panic if it sits at 40% for ten minutes.
What Actually Worked For Me
My first instinct was to just retarget the project to whatever toolset I had. That didn’t work — VS kept throwing the same error even after retargeting, which honestly threw me off for a bit. I assumed the project file was corrupted somehow.
Turned out the real problem was that my Visual Studio Installer showed the C++ workload as installed, but when I actually went digging in C:\Program Files\Microsoft Visual Studio\2022\Community\VC\Tools\MSVC, the folder was basically empty. The installer’s own status was wrong. So I ran a full Repair, not just a Modify, and that’s what actually pulled down the missing compiler files. Modify alone hadn’t done it — I think because the installer still believed the component was already there.
Lesson learned: if the checkboxes say something’s installed but the error persists, don’t trust the checkboxes. Go look at the actual folder.
Advanced Fixes and Edge Cases
Check the installer log for silent failures. Visual Studio Installer logs live under %TEMP%\dd_setup_*.log. If a component failed to download mid-install, it’ll show up here even if the installer UI never surfaced an error to you.
Multiple VS versions fighting over PATH and registry keys. If you’ve got 2019 and 2022 installed together, open a Developer Command Prompt specifically for VS 2022 (not the generic one) and run cl.exe to confirm which compiler actually responds. If it’s pulling the wrong version, you may need to uninstall the older instance cleanly using the Installer, not just deleting the folder.
Command-line verification with vswhere. Microsoft ships a tool called vswhere.exe (usually under C:\Program Files (x86)\Microsoft Visual Studio\Installer) that can list every installed VS instance and its components:
vswhere.exe -all -products * -requires Microsoft.VisualStudio.Component.VC.Tools.x86.x64If this comes back empty, the component genuinely isn’t there, no matter what the GUI says.
ARM64 build configurations. If you’re building for ARM64 specifically, you need the separate ARM64 build tools component — it’s not automatically bundled with the standard x64/x86 v143 tools. This one trips people up because the error message looks identical regardless of architecture.
Prevention Tips
- When installing Visual Studio on a new machine, install the C++ workload upfront even if you’re not sure you’ll need it yet — saves a modify-and-restart cycle later
- Avoid running Windows Update or a reboot mid-installer if you can help it; interrupted installs are a common root cause here
- If you maintain a shared repo, consider using
<PlatformToolset>$(DefaultPlatformToolset)</PlatformToolset>instead of hardcoding a version, so it adapts to whatever’s installed - Keep VS Installer itself updated — an outdated installer occasionally misreports component status
Frequently Asked Questions
Does retargeting the project change my source code? No. It only changes the toolset reference in the project file, not your actual C++ code.
Can I have v142 and v143 installed at the same time? Yes, and it’s actually pretty common. You can check both individual components in Visual Studio Installer and switch between them per-project.
Will uninstalling and reinstalling Visual Studio fix this faster than Repair? Usually not, and it’s a lot more disruptive. Repair addresses the same underlying issue in most cases without wiping your settings and extensions.
Why does the installer say the component is checked but the error still shows up? This is the installer’s own status tracking being wrong, which happens more than Microsoft would probably like to admit. A Repair fixes it more reliably than toggling the checkbox off and on.
Does this happen with Visual Studio Code too? Not in the same way — VS Code doesn’t ship its own MSVC compiler. It relies on whatever toolset is installed via full Visual Studio or the standalone Build Tools installer, so the fix is basically the same underlying step.
Is there a way to avoid this when setting up a CI build agent? Yes — install the specific workload and component IDs directly using the Visual Studio Build Tools bootstrapper with the right --add flags for Microsoft.VisualStudio.Component.VC.Tools.x86.x64, rather than relying on a generic VS install.
Do I need the full Visual Studio IDE, or can I just install Build Tools standalone? For most CI and command-line scenarios, the standalone Build Tools installer is enough — you don’t need the full IDE just to get the v143 compiler.
Why does this error sometimes appear only after a Windows update? Windows updates can occasionally touch registry associations tied to installed components. It’s not the most common cause, but I’ve seen it reported enough times to mention it.
Editor’s Opinion
honestly this one bugged me more than it shoud have. the installer telling you somethin is installed when it clearly isnt is just bad UX, not gonna sugarcoat it. repair fixed it for me in like 15 mins once i actually tried it instead of messing with the vcxproj file five different times. if the checkboxes look right and its still broken, just repair first, save yourself the loop i went through.
